Our Test automation journey
We have been doing test automation for a year and a half, and we are really proud of where we are today. This is the story of how we got here and where we are right now.

Keep in mind that this is a description of our journey and it should not be used as a template of how to do it. We hope that our story can help or inspire others on their journey; if it does, then our purpose for writing this will have been fulfilled.
Selecting the framework
Choosing a framework was a big challenge. You always need to keep many things in mind: what kind of tests will be written, what language you want to use, will developers be involved, who will write tests, who will support them, how you want to get the results, how much you want to cover and so on.
Cross platform
Since our application is cross-platform (iOS and Android) the most obvious choice was to choose a cross-platform framework. The biggest advantage is that there will be a common part and that you, as a Test automation (TA) engineer, do not need to learn several languages and support several systems. Also, there will only be one reporting system—which is the most important part of testing. Of course, it is not that simple as you are working with two completely different applications despite having similar designs, and even if you have one framework you will, in most cases, need to write different tests. So what is the point? The most complicated part is not writing tests but working with data and generating the right reports. In the case of a cross-platform framework, the latter will remain the same.
Make sure there is an active community working with the framework you choose!
With that in mind, the task was not that hard anymore. There are not that many frameworks that support both platforms. Frankly, if you want to choose something that will last for several years and will be easy to work with then you need something that is widely used and documented well. The last part is important. When you use the framework there will be problems you will not be able to solve yourself. You will have to google, A LOT, and ask the developers of the framework, and google again. This is unavoidable. We had to be sure the framework community regularly answers questions and that there are a lot of answers on websites such as StackOverflow, or Google groups. Also, the language… it will be much easier if you know it.
Test the framework
So the search began. The final candidates were Appium and Calabash. For backup, we had Espresso for Android tests and XCUITest for iOS. Appium looked great, it was quite easy to install everything and write the first test. Also, they support a couple of languages to choose from. Java suited really well, however after a successful first test on Android there was a huge disappointment: iOS was slow. Not the kind of slow you can deal with, but REALLY slow. Whatever solution we thought there was—nothing worked, days were wasted and Appium was still too slow. Time to move on.
#justworks
The second on the list was Calabash. Calabash only supports Ruby, which is fine, because part of our legacy backend is written in Ruby. This means that developers will be able to help out and educate. Calabash did not have a fancy UI compared to Appium and it seemed to be less used. Nonetheless, it was considered one of the best options out there. Surprisingly after an hour reading docs and preparing the environment everything just worked. It worked evenly on both platforms. After years of fighting with different kinds of software, I understood the golden rule: if it works without much effort—stick with it. That was it.
Architecture
Whenever you read about test automation, you always run into warnings that it is not worth the effort, because it always becomes so hard to maintain. So, how did we tackle this?
Given When Then
One great thing you can do is to write scenarios using Cucumber. Using this pattern when writing tests really helps in making the tests easy to read, not just for those of us working with test automation but for everyone within the company. It gives you a great error report format while at the same time describing the behaviour of the system, and it actually gives you a living documentation of the system.
It is also very easy for the quality assurance engineers to see what is covered by test automation and what they should verify manually. We have even used these scenarios to teach new engineers the behaviour of the app. When we rebuilt parts of the app in a project, we often got stuck in discussions on how a particular feature was supposed to work but then we could simply look at the test cases to sort out the behaviour.
Page object pattern
Page object patterns are widely used in test engineering, and they give you a nice structure of your code, making it reusable and maintainable. Using a pattern turned out to be a great idea. Now, it was easier to navigate between tests, to see common parts and differences between Android and iOS. We have implemented it in a way that we have a page object class for each view (or sometimes part of a view), and all of the IDs and methods for interacting with the different controls of the view are gathered in one place. Some useful links: Martin Fowler - Page Object, Page Object Model (POM) | Design Pattern
Even more maintainable
We also tried to keep our structure in modules. The reason for that is simple: when you decide about test architecture you should think about what happens if the framework you have chosen dies? Should you just throw away years of work and start all over again? That is not the best way of doing it. All of our tests have separate layers which, in case of emergency, can be moved to a different framework or easily rewritten.
This recently happened to us with a module that reads all of the data for ads since we are switching to a different system. Now we have to rewrite only that part and nothing else.
We also have a helper class with common methods, our constants are separated in another class (which helps a lot to store it in only one place if you want to change timeouts or something similar), several data classes for working getting data, filtering it, and a couple more divided according to their purpose.
Continuous Integration (CI)
After the framework was set in place and we covered some parts of our app with tests, we needed to make sure everything worked as expected, so it was now time to set up the way we run everything on a regular basis. So we needed CI.
Start with hosting the CI locally
Throughout the company there was no common way to run builds and unit tests for clients (except for backend, they were doing great), so we decided that we needed something for that as well, not only for end-to-end (E2E) tests. The idea was to find something that can be run locally, at least from the start. We had to use emulators or real devices for E2E tests and it is easier to maintain yourself, you get less flaky tests, and it is more stable. Should that work well and we need to grow bigger—there will always be an option to move everything to the cloud. We had our Mac mini as a server where we could start testing and trying different tools.
Team City vs. Jenkins
After googling and trying different ones the best two candidates were Team City and Jenkins. With Team City it did not really work as we had hoped, we were struggling to set everything up. Nothing worked, so we decided to try to do the same thing with Jenkins, and if that did not work—come back to Team City. However, we never needed to. Jenkins just worked. It has thousands of plugins for anything you need, which is nice. The downside is that it is quite complex to deal with plug-ins because they are written by different people and there is not always an obvious way of using them. I would say it is quite hard and time-consuming to set everything up, but after it was done—you barely need to do anything (only in cases when they change something in the plug-ins).
This is how it looks now:
Choose what to automate with E2E tests
Another big question within test automation is “What should we automate?”. The following approach we took to answering that question.
Based on analytics—our most used views
We started by gathering data about the usage of the different views and the more views a page had, the higher priority it got. We already had analytics in place, so it was quite easy to get this data. With some help from our colleagues, we also learned some BigQuery, which is very useful to know as a test engineer. Backing up an argument with data, as to why we should spend time fixing a bug, will definitely increase your credibility.
Learn along the way
We also made sure to cover critical bugs that we found either during release testing or that got out to our users. We held a post-mortem for critical bugs where we discussed how we can prevent this from happening again. Not all bugs were suited for getting covered by E2E tests, it could lead to a unit test, or in some cases even a manual test.
Trust the tests
Sometimes it is just not worth the effort of creating an automated test. A test that is very hard to build, or if you are building it with the knowledge that it might get flaky, it is probably better to not build it. Although, if you still think it is worth the effort, make sure to run it in a separate build where you can check it manually. Having a test suite that is constantly red will only make you ignore it, and you will miss important bugs.
Test data is tricky
Test data is always an issue, and we tried to avoid building tests that were dependant on data, but eventually, we couldn’t avoid it anymore. We are working on a solution where we can start the client with a predefined state, but until that is in place, we are using our API to get IDs to entities that match our needs. This actually turned out to be a really good solution but we’ve decided to move on with the more complex solution since that will give even more stability to the tests, and fulfil some needs that we don’t cover today.
Reporting
Test runs without good reporting do not make any sense. This part is really worth putting some extra effort into. If you have readable reports, people will get engaged. It also makes your daily work with the tests so much easier, if you can get a good overview of their state.
Good default reports
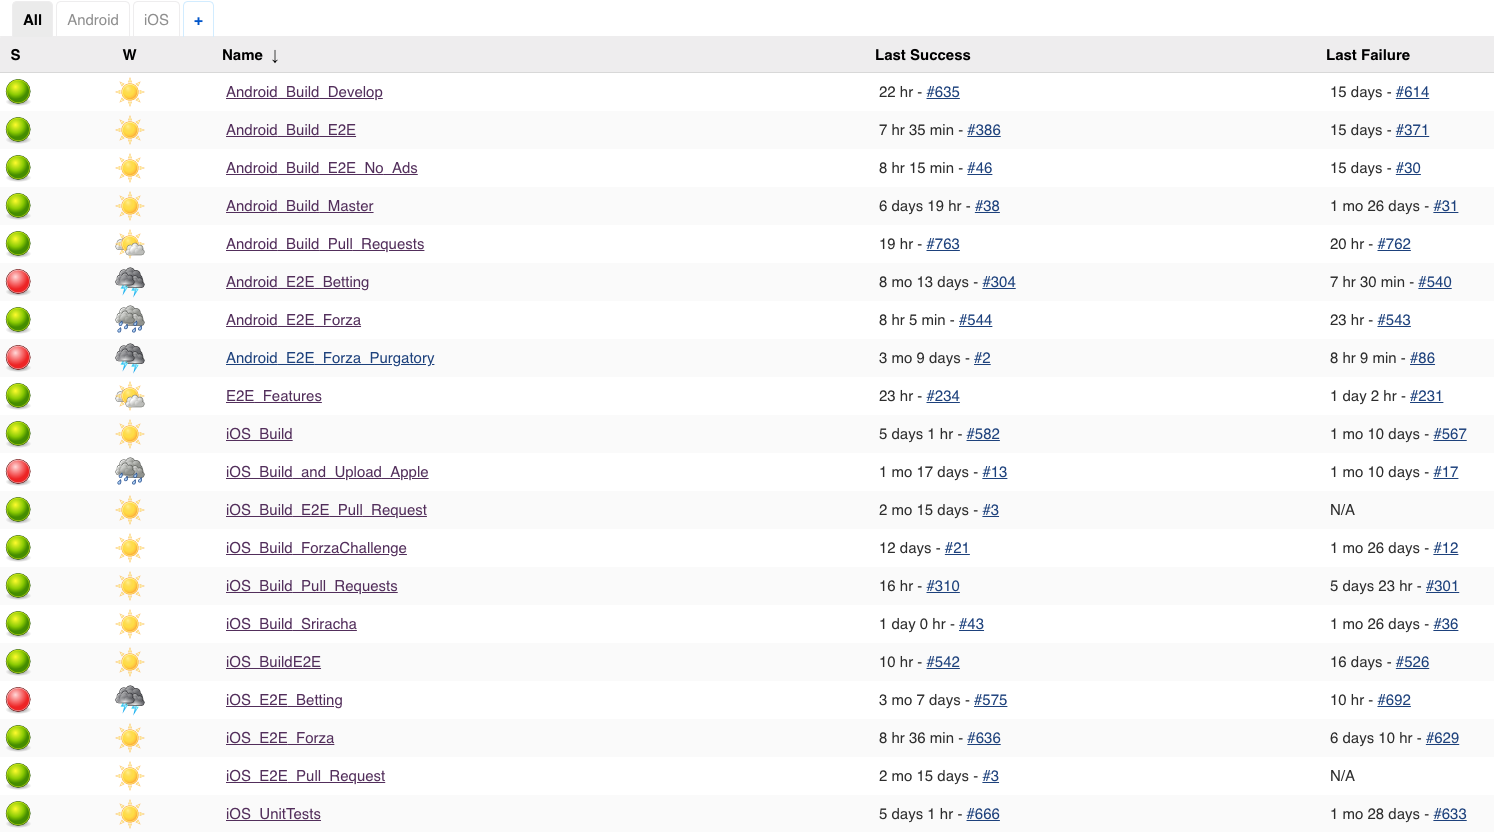
For E2E test reports we used a standard Cucumber plugin which generates a nice web page integrated in Jenkins.
Customized test result reports
After a while we changed the concept of how we treat our results. The idea was to write all scenarios we want to cover on all features of the app, but they will be in a pending state. That is how we are measuring the coverage of system. The issue was that standard report considered pending tests as a failure and we did not want that. This forced us to write our own report. Actually, that is what I really like about Jenkins—it is amazingly customizable. After our report generator was ready it was really easy to integrate it with Jenkins.
So now it looks like this (much more modern and stylish, we like it much better):
We also use JUnit plugin for unit tests JUnit plugin and Slack notification plugin for Slack reports.
Slack
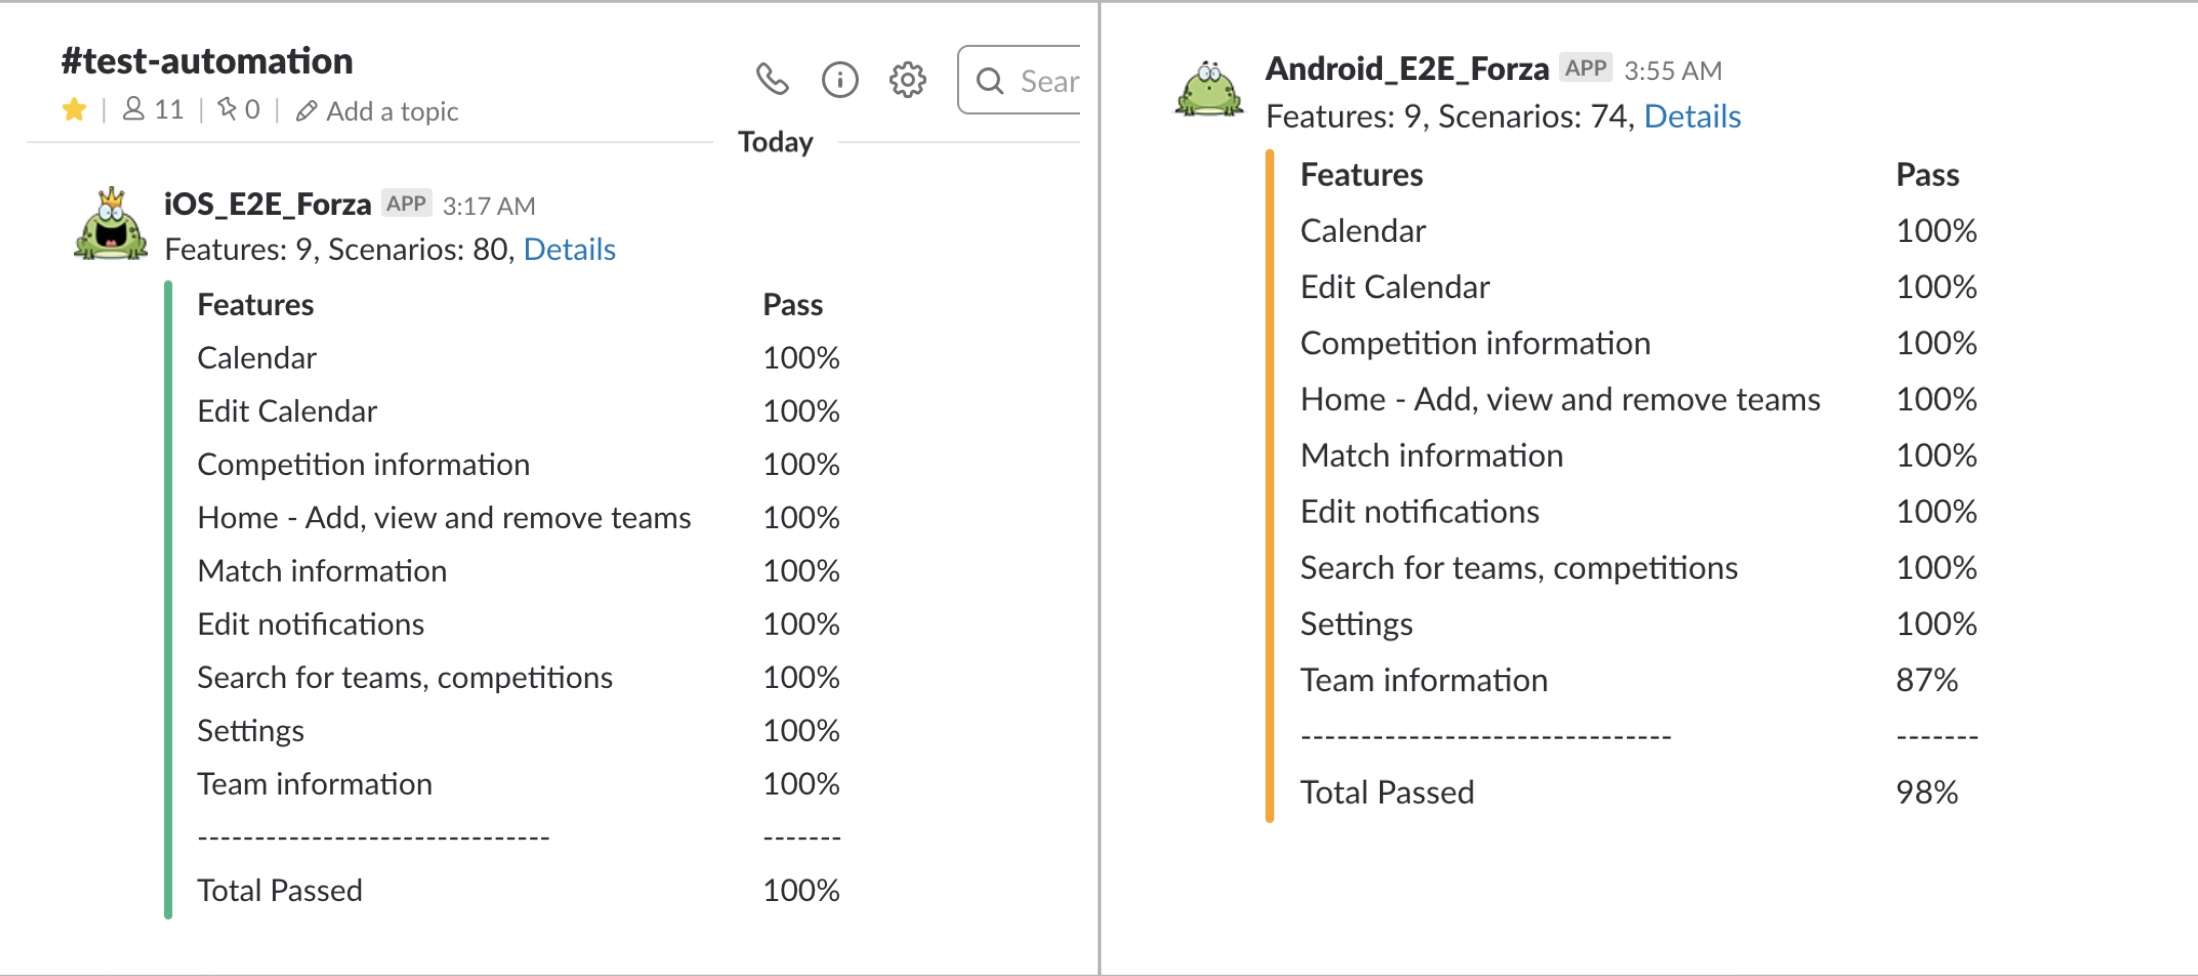
We have our custom Slack reports for E2E tests as well. A simple Ruby app that generates exactly what we need with the right data and logo (luckily Slack has very nice open API that everyone can use). It was very easy to call it from a Jenkins’s job as a post-build task.
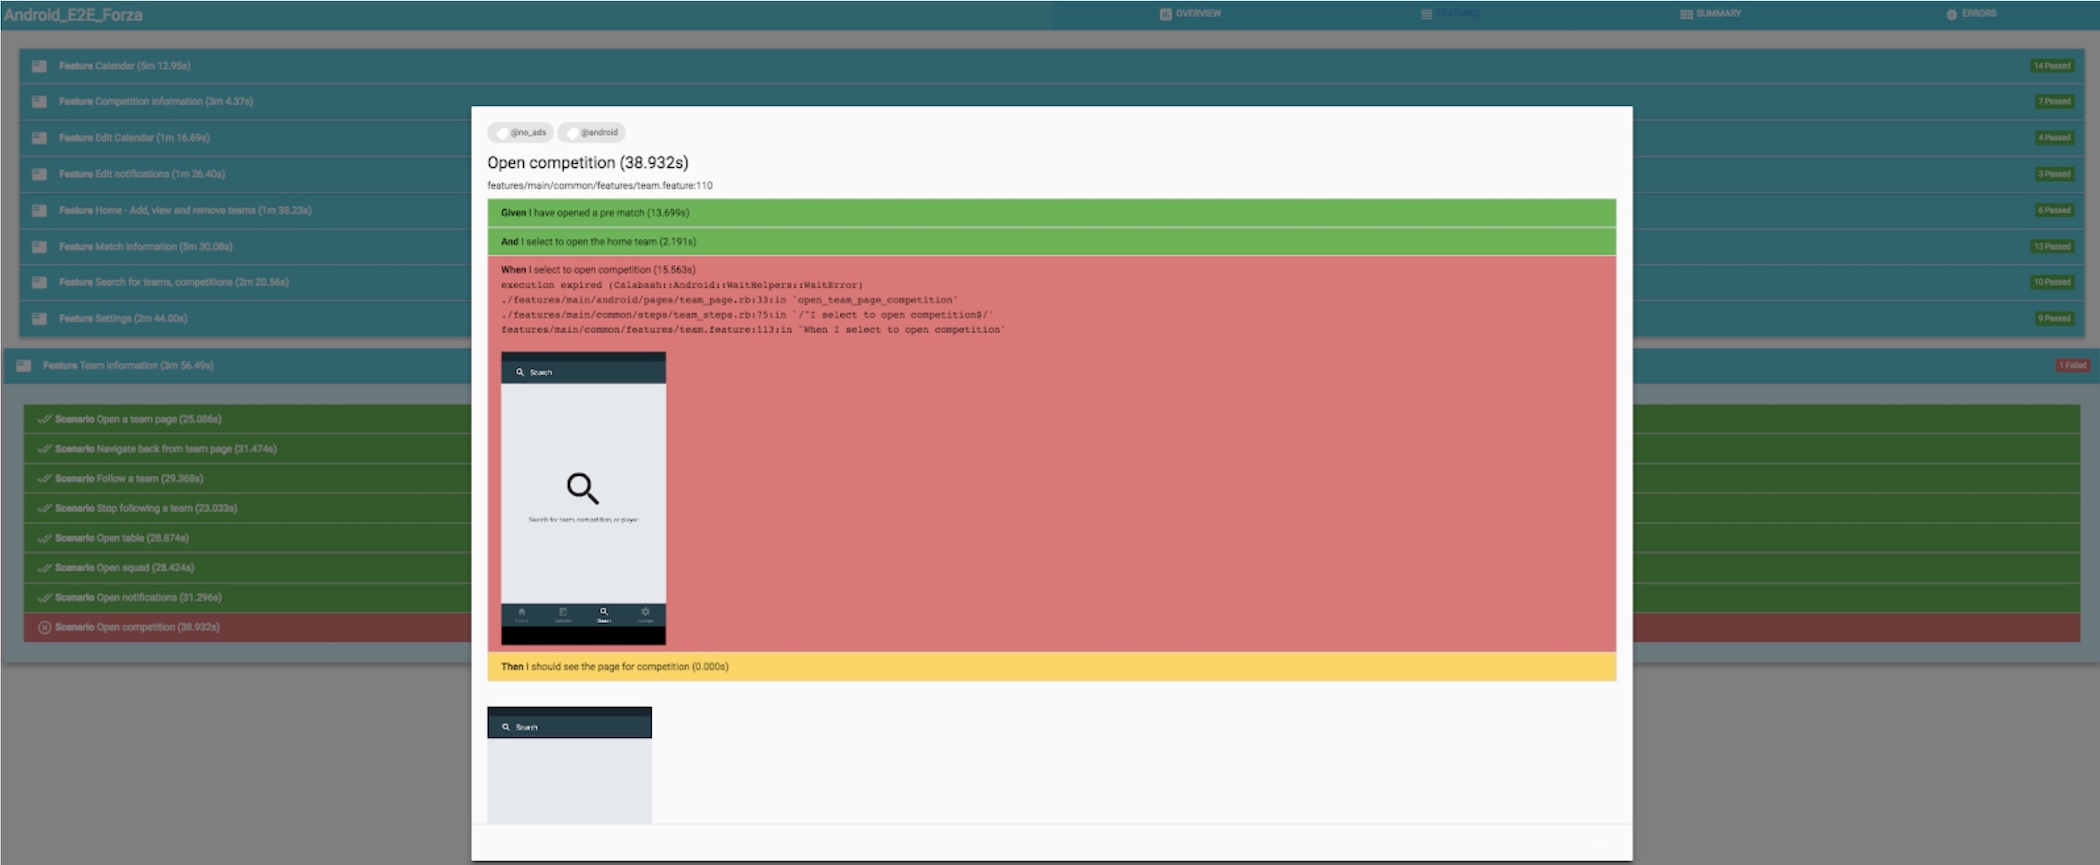
We have reports from most of our builds reported to different Slack channels. There is one test-automation channel where most E2E test reports are displayed, some builds send reports to iOS, Android, or even squad channels. There is a link in each report where you can find a more detailed test report to see exactly what step is failing. You even see screenshots of which state the client was in when the test failed.
These reports are used by people in all different roles. It can be an iOS developer checking what failed in the latest nightly build or a QA engineer checking the state of the client before releasing.
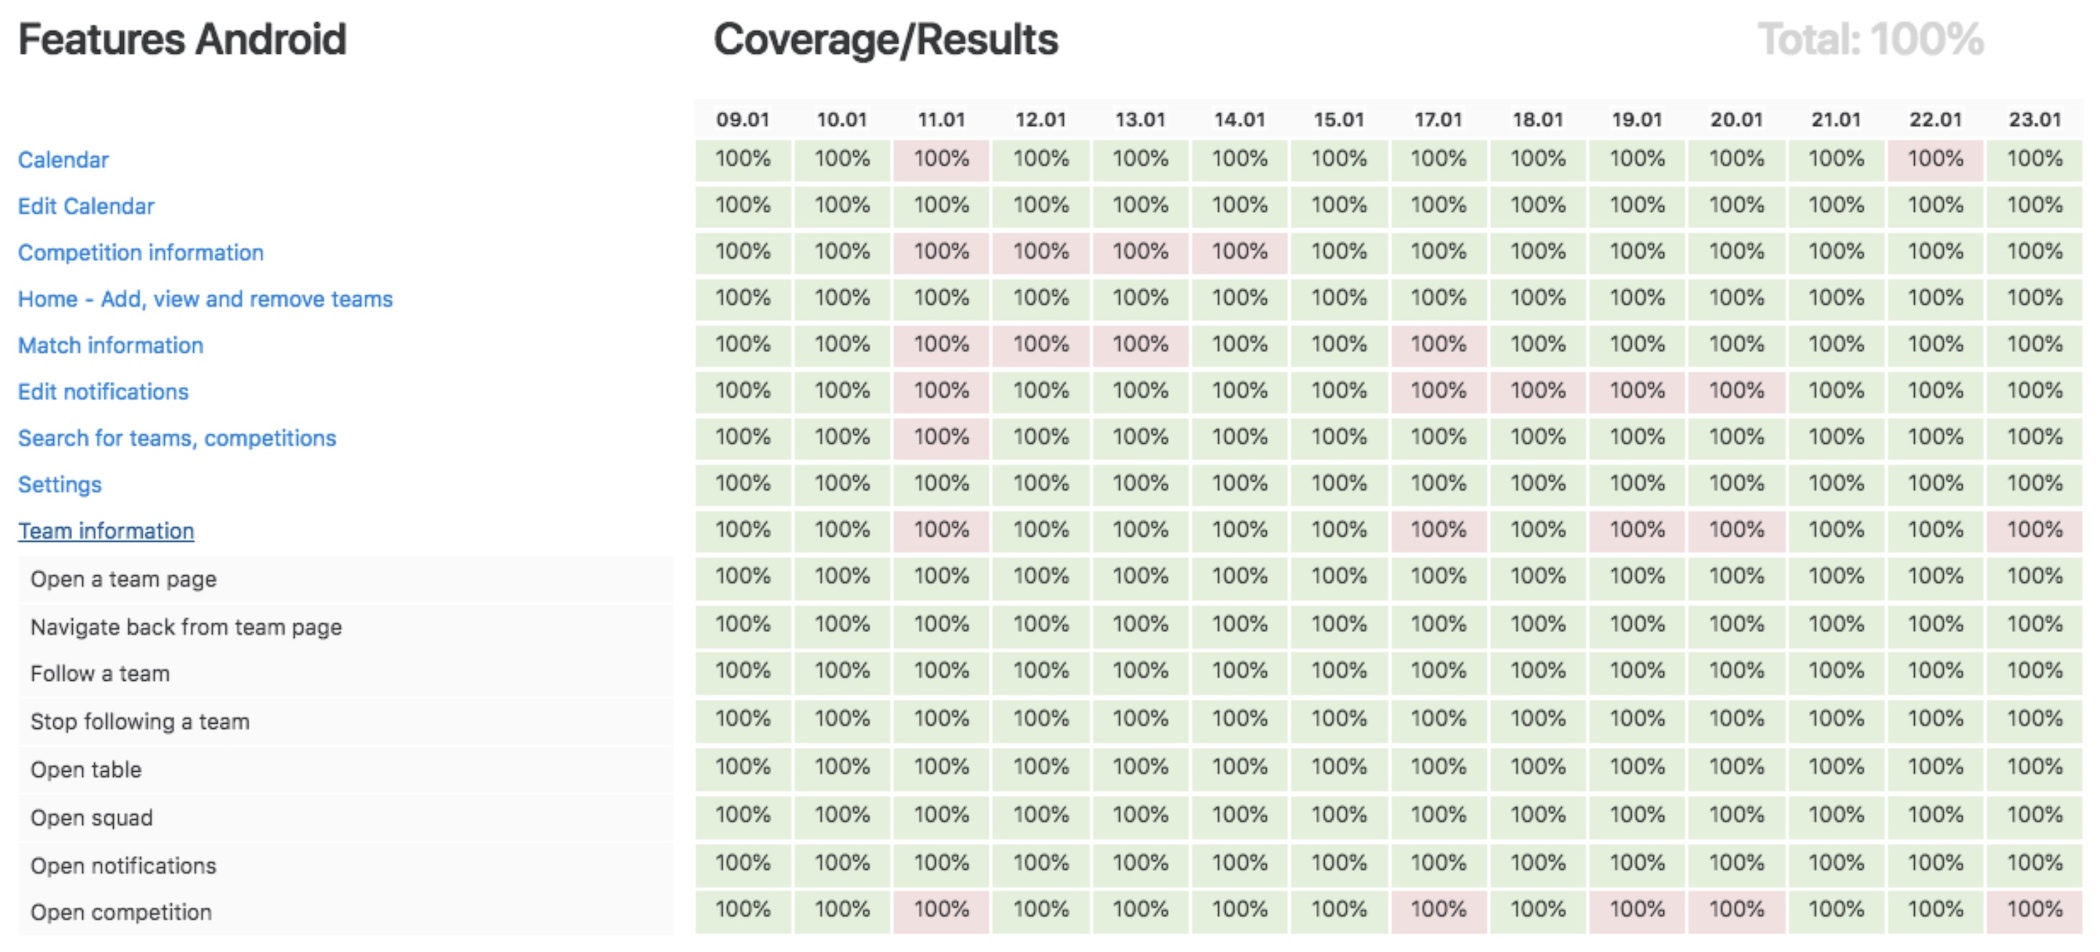
Feature coverage report
This function is very useful when investigating if a failing test failed for the first time in a longer period, or if there is a pattern to the failures. For example, we found that one of our tests was failing every Sunday, due to a bug in the test code, only happening on every Sunday. This would have been very hard to investigate without this report. Given you get the date it fails, it is really easy to go back to Jenkins and see if it fails on the same thing. If you have flaky tests (which you, of course, should not have, but let’s face it, sometimes we just do), this is very valuable to make sure you are fixing the flakiness.
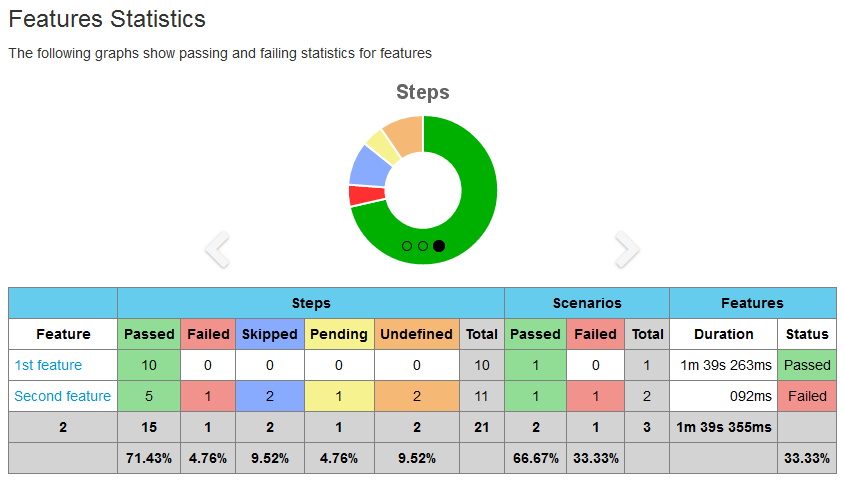
We also have the feature coverage percentage displaying here, letting us know how much of the features we intend to cover with E2E tests, that are actually covered.
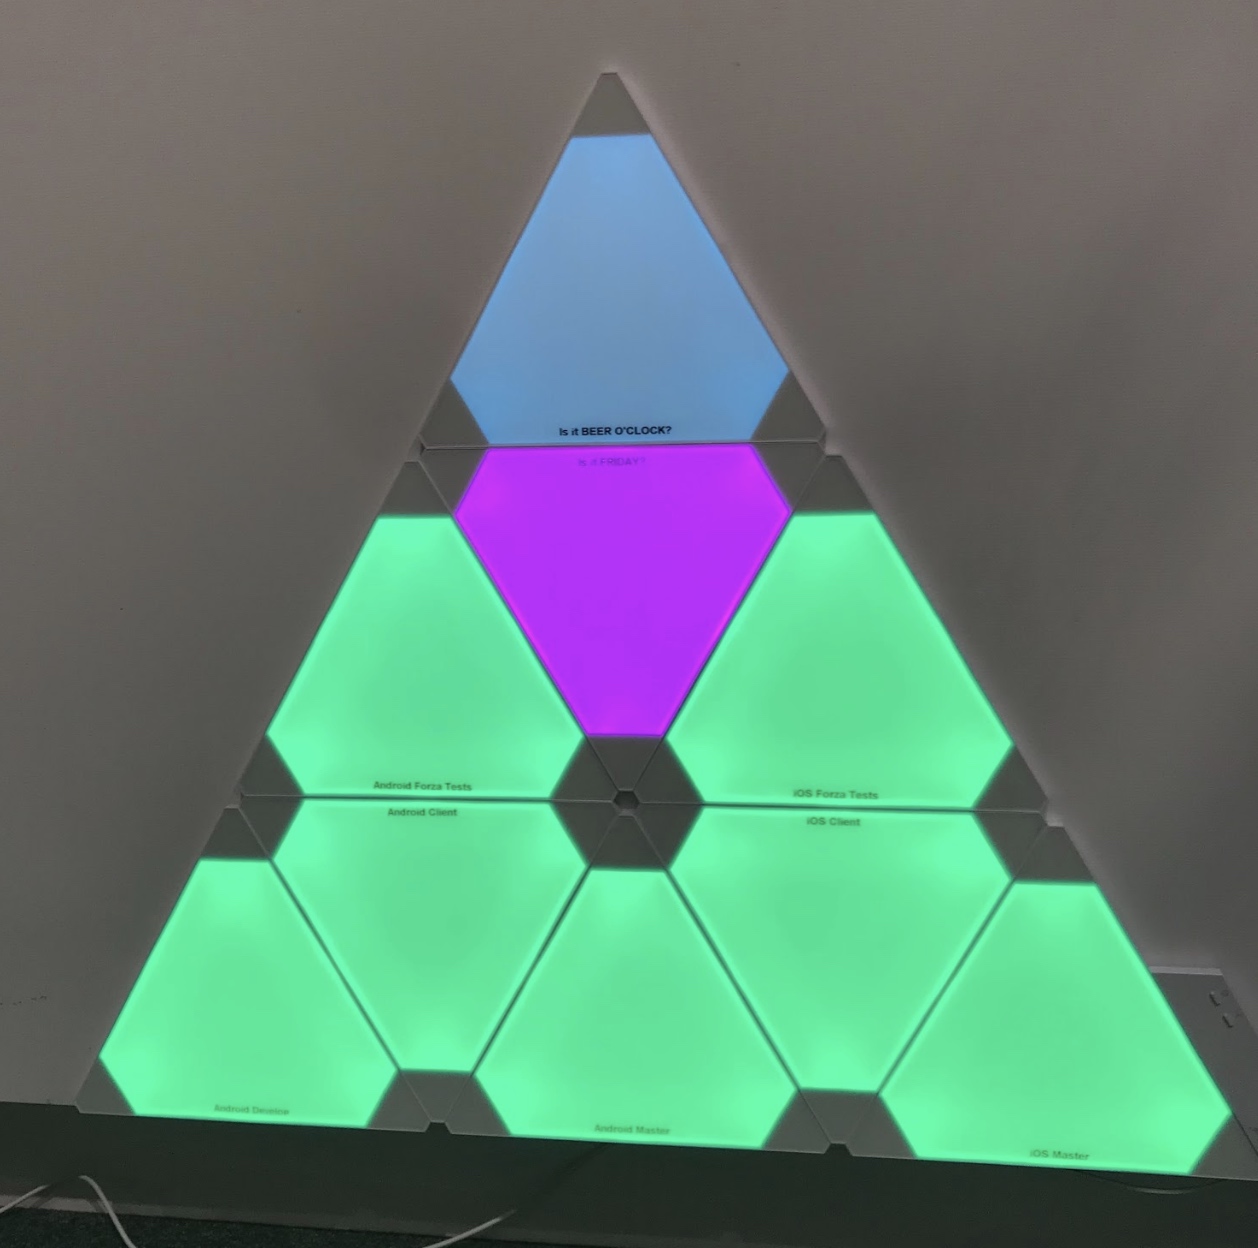
Nanoleaf
Finally, on our most high-level report, we have a triangle made of Nanoleaf panels, where each panel represents a selected build. This is the result after a hack week we had in one of the squads.
Here, the bottom row represents client builds and unit test runs and the middle layer shows if E2E tests on iOS and Android have passed or failed.
It also keeps track of other essential things, like if it is Friday and Beer O’clock :)
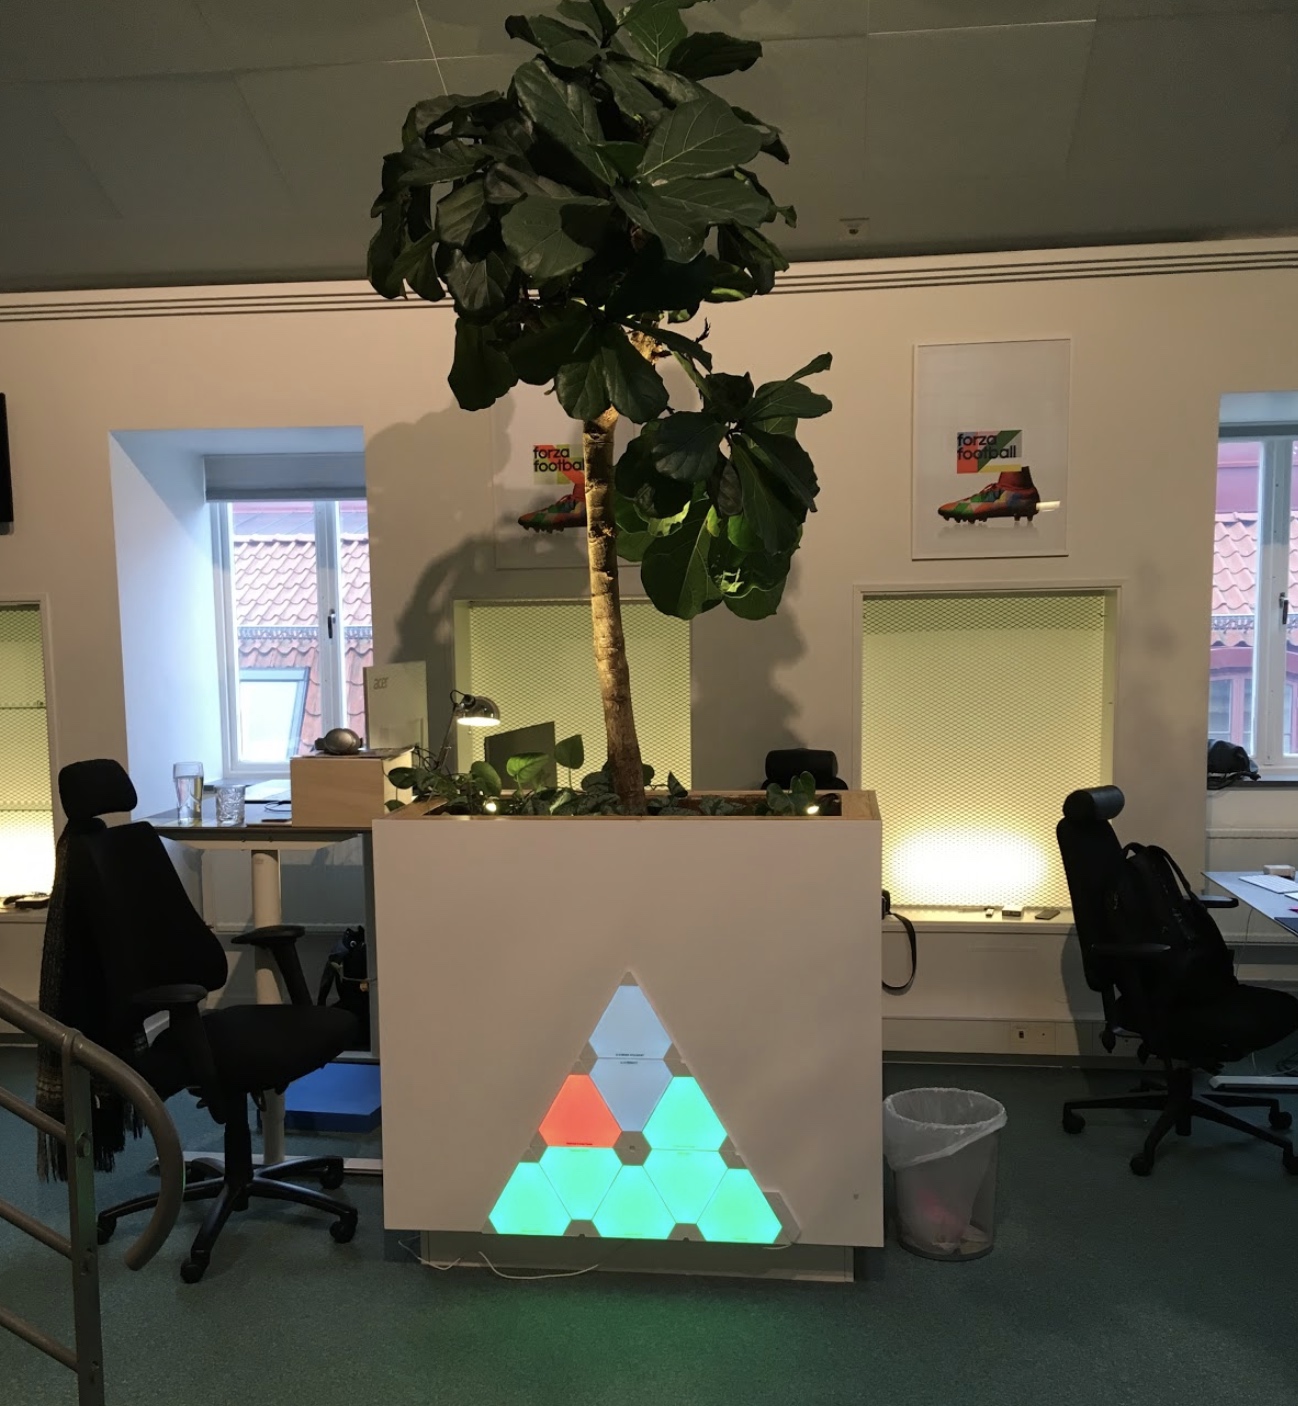
It is all about visualization
We have put them in a place where almost everyone passes by, so when tests are red people ask us why they are failing. It has been a good and fun way to visualize test results.
Summary
Our path was long and complicated but also fun and exciting! And it is way far from its end. We are hoping that our journey will bring some value and inspiration. Good luck and remember: more challenges you face—the stronger you get.